
Avoid the “patchy panic” and the “over-trimmed tragedy.” Master these simple techniques to shape your beard like a pro—even if you’ve never touched clippers before.
You’ve finally done it. You survived the itchy phase, resisted the urge to shave, and now you have a respectable amount of facial hair. But there’s a problem: it looks more like a wild hedge than a well-groomed statement.
Trimming a beard properly is the single most important skill any bearded man can learn. Without it, even the thickest, healthiest beard looks unkempt. With it, a modest beard can look intentional, sharp, and attractive.
The good news? Trimming is not difficult. You just need the right tools, a little patience, and this beginner’s guide.
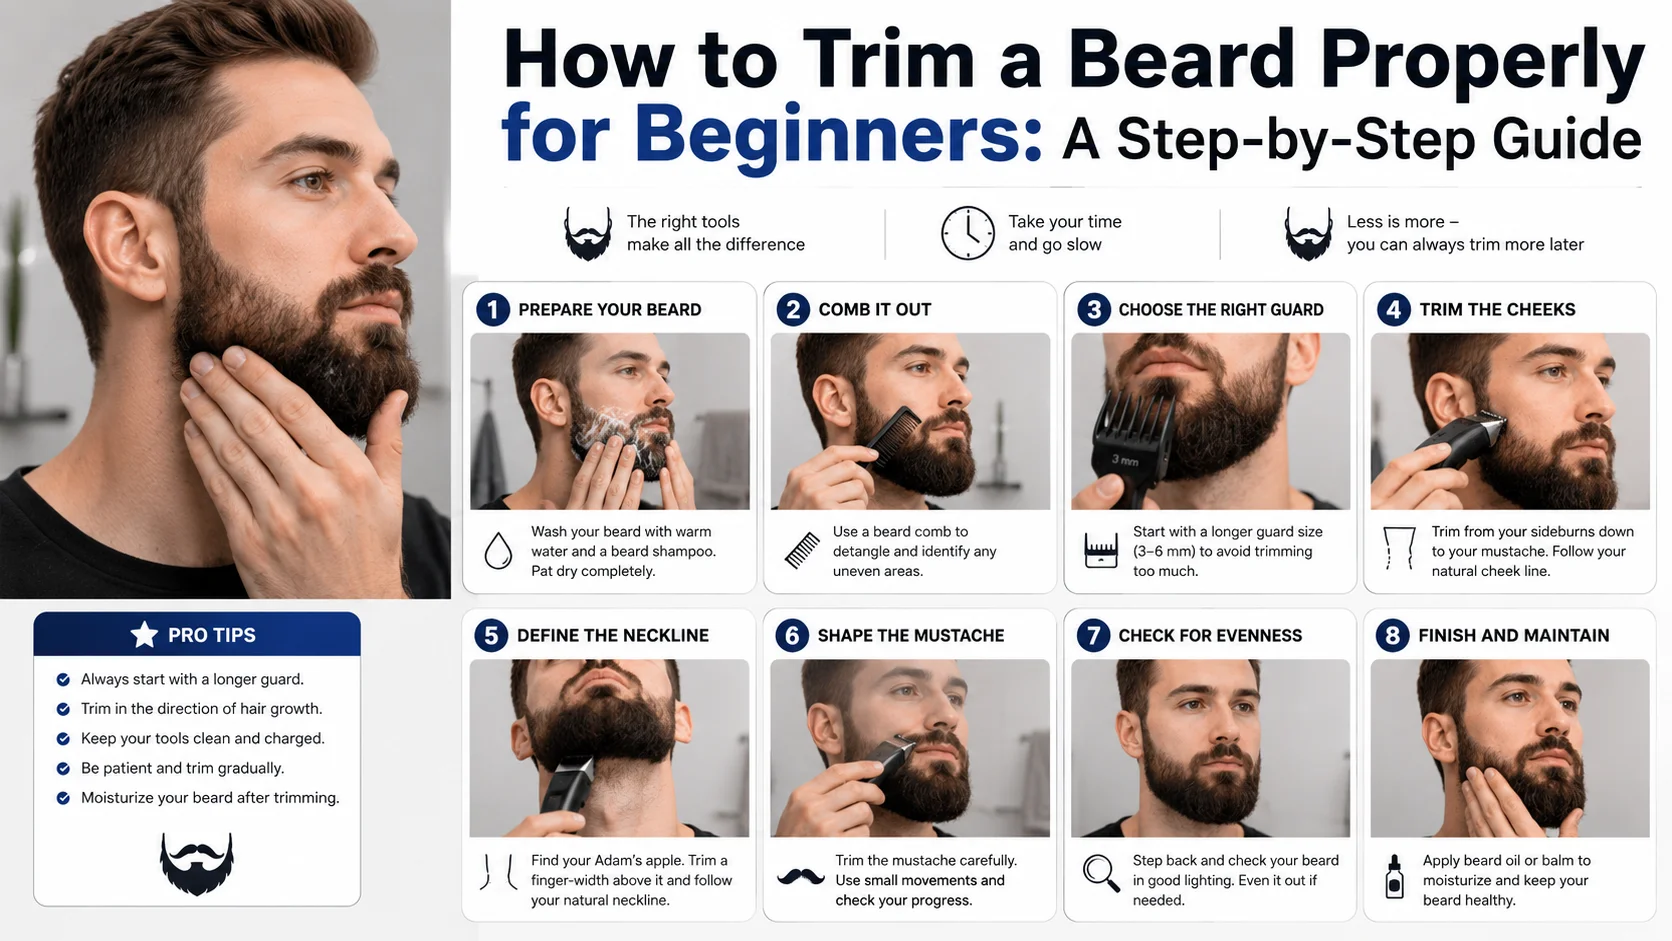
Step 1: Gather Your Essential Tools
Before you touch a single hair, make sure you have the following. Using the wrong tools is the fastest way to ruin your beard.
- Beard Clippers (Not Hair Clippers): Hair clippers are often too powerful and have wider blades. Invest in a dedicated beard trimmer with multiple guard lengths.
- Scissors (Barber Shears): For precision work around the mustache and stray long hairs. Never use kitchen or craft scissors.
- A Fine-Tooth Comb: To detangle and lift hairs so you cut evenly.
- A Handheld Mirror: To see your side profiles and underneath your chin.
- A Cape or Old Towel: Trimming makes a mess.
Step 2: Start with a Clean, Dry Beard
This is the most common beginner mistake. Do not trim a wet beard.
- Why? Hair shrinks and curls as it dries. If you trim wet, you will end up with a beard that is much shorter than you intended once it dries.
- The Right Way: Wash your beard with beard shampoo (or a mild cleanser), towel dry it gently, and then let it air dry completely. Once it is 100% dry, you are ready to trim.
Step 3: Choose Your Guard and Start Long
Never start with a short guard. You can always take more hair off, but you cannot put it back.
- Pick a guard length that is longer than you think you need. If you want a 10mm beard, start with a 12mm or 14mm guard.
- Trim in the direction of hair growth (usually downward on the cheeks, outward on the neck).
- Use light, sweeping motions. Do not press hard or go over the same spot repeatedly, or you’ll create bald patches.
Step 4: Trim in the Correct Order (Cheeks → Neck → Chin)
Follow this sequence to avoid shaping errors.
A. Define Your Cheek Line
Most men have a natural line where their cheek hair thins out. Use your trimmer without a guard (or with the smallest guard) to remove stray hairs above that line.
Pro tip: Do not carve your cheek line too low. A natural, slightly curved line looks much better than a sharp, pencil-thin line.
B. Trim the Neckline (The Most Important Step)
A bad neckline ruins a good beard. Here is the rule: Two fingers above your Adam’s apple.
- Place two fingers horizontally just above your Adam’s apple.
- That point is where your neckline should start.
- Shave or trim everything below that line. Everything above stays.
Avoid the “chin strap” mistake: Do not follow your jawbone. A neckline that follows the jaw looks like you’re wearing a costume beard.
C. Shape the Bottom (For Longer Beards)
If your beard extends below your chin, use a longer guard (e.g., 16mm–20mm) and trim the bottom edge so it forms a gentle “U” shape, not a sharp “V.”
Step 5: Detail Work – Scissors Are Your Friend
After using clippers, look for flyaway hairs – those single strands that stick out like antennas.
- Gently comb your beard forward.
- Use your barber shears to snip only the tips of the hairs that extend beyond the main shape.
- Never cut straight across the bottom. Instead, point your scissors vertically and make small snips to create a soft, natural edge.
Step 6: Don’t Forget the Mustache
A great beard needs a tidy mustache.
- Comb your mustache downward.
- Use scissors to trim any hairs that cover your upper lip line.
- For a neater look, trim the corners of your mustache so they don’t hang over your mouth.
Common Beginner Mistakes to Avoid
| Mistake | Why It Hurts | The Fix |
|---|---|---|
| Trimming wet | Beard becomes too short when dry | Always trim 100% dry |
| Using a mirror too close | You lose perspective | Step back 2–3 feet every minute |
| Cutting straight across the bottom | Looks unnatural and blunt | Use vertical snips with scissors |
| Shaving the neckline too high | Creates a “neck beard” look | Stay 2 fingers above Adam’s apple |
| Trimming when frustrated | Leads to over-trimming | Stop if you feel rushed or angry |
How Often Should a Beginner Trim?
- For growth: Trim only once every 2–3 weeks to let length accumulate.
- For maintenance: Once a week to keep the neckline clean and remove split ends.
- The golden rule: Trim less than you think you need. A slightly messy beard is better than an over-trimmed one.
The Verdict
Trimming your beard properly as a beginner is not about achieving perfection overnight. It is about learning to maintain rather than sculpt. Start with longer guards, always trim dry, and prioritize your neckline above all else.
Remember: every expert beard grower once over-trimmed and regretted it. Be patient, practice every week, and within a month, you will wonder why you ever paid for barbershop trims.
🛒 Exclusive Affiliate Offer: Essential Beard Trimming Kit for Beginners
Ready to trim like a pro? Start with the right tools. We’ve partnered with CosmoClinic-20 to bring you a complete beard grooming kit that includes precision clippers, multiple guards, barber shears, and a styling comb – everything a beginner needs.
👉 [Click Here to Get Your CosmoClinic-20 Beard Trimming Kit on Amazon]
(https://amzn.to/4tNuxBW)
Why This Kit is Perfect for Beginners:
- ✅ Adjustable length guards (3mm–18mm) – start long and work your way down
- ✅ Precision scissors for flyaways and mustache trimming
- ✅ Cordless and rechargeable – no tangling cords while you learn
- ✅ Includes a cleaning brush and storage case
Limited stock available through this link. Equip yourself properly and avoid beginner trimming disasters.
Disclaimer: As an Amazon Associate, I earn from qualifying purchases. This helps support the creation of more beginner-friendly grooming guides at no extra cost to you.
Author
cosmohospitalhyd@gmail.com
Related posts

How to Grow a Beard With Bad Genetics (Yes, It’s Possible)
Let’s be real – not everyone is born with a chiseled jawline and a lumberjack beard. Some of us got patchy sides.A...
Read out all
Top Biotin Supplements for Beard Growth: Do They Really Work?
Walk into any supplement aisle, and you’ll see glowing promises: “Biotin for thicker beard, faster growth, and dense coverage.” TikTok and Reddit...
Read out all
What Blood Tests Are Done for Hair Loss? Hair Loss Isn’t Just Genetic—5 Tests You Must Do Before It’s Too Late
Medically reviewed by Dr. Mohammed Abdul Azeem Siddiqui, MBBS (30+ years clinical experience) What blood tests are done for hair loss? The...
Read out all
Hollywood Actors Beard Styles Every Man Should Try (And How to Get the Look)
Let’s be honest. When you see Chris Hemsworth’s rugged stubble, Henry Cavill’s perfectly sculpted short boxed beard, or Keanu Reeves’ effortlessly cool...
Read out all
Can Beard Growth Patterns Reflect Immune Health? What Your Whiskers Are Whispering
You look in the mirror. One side of your jaw is lush and full. The other side looks like a desert with...
Read out all
Best Natural Oil for Beard Growth and Thickness: 7 Science-Backed Oils That Actually Work
If you’ve been struggling with patchy cheeks, a thin mustache, or a beard that refuses to reach its full potential, you’re not...
Read out all