Do eyelashes grow back? Can you use a curler with extensions? We answer every burning question.
Let’s face it—long, lush eyelashes are the ultimate beauty weapon. They frame your eyes, make you look awake without caffeine, and reduce the need for heavy eye makeup. But with so many options on the market—from eyelash extensions to magnetic eyelashes and eyelash growth serum—it is easy to feel overwhelmed.
This guide covers everything: how to choose between eyelash and hair extensions, whether do eyelashes grow back after damage, and which tools (including the cult-favorite shiseido eyelash curler) actually work.
Let’s dive in.
1. Do Eyelashes Grow Back? The Honest Truth
One of the most common questions is: do eyelashes grow back after falling out or being pulled?
The short answer is yes—but patience is required.
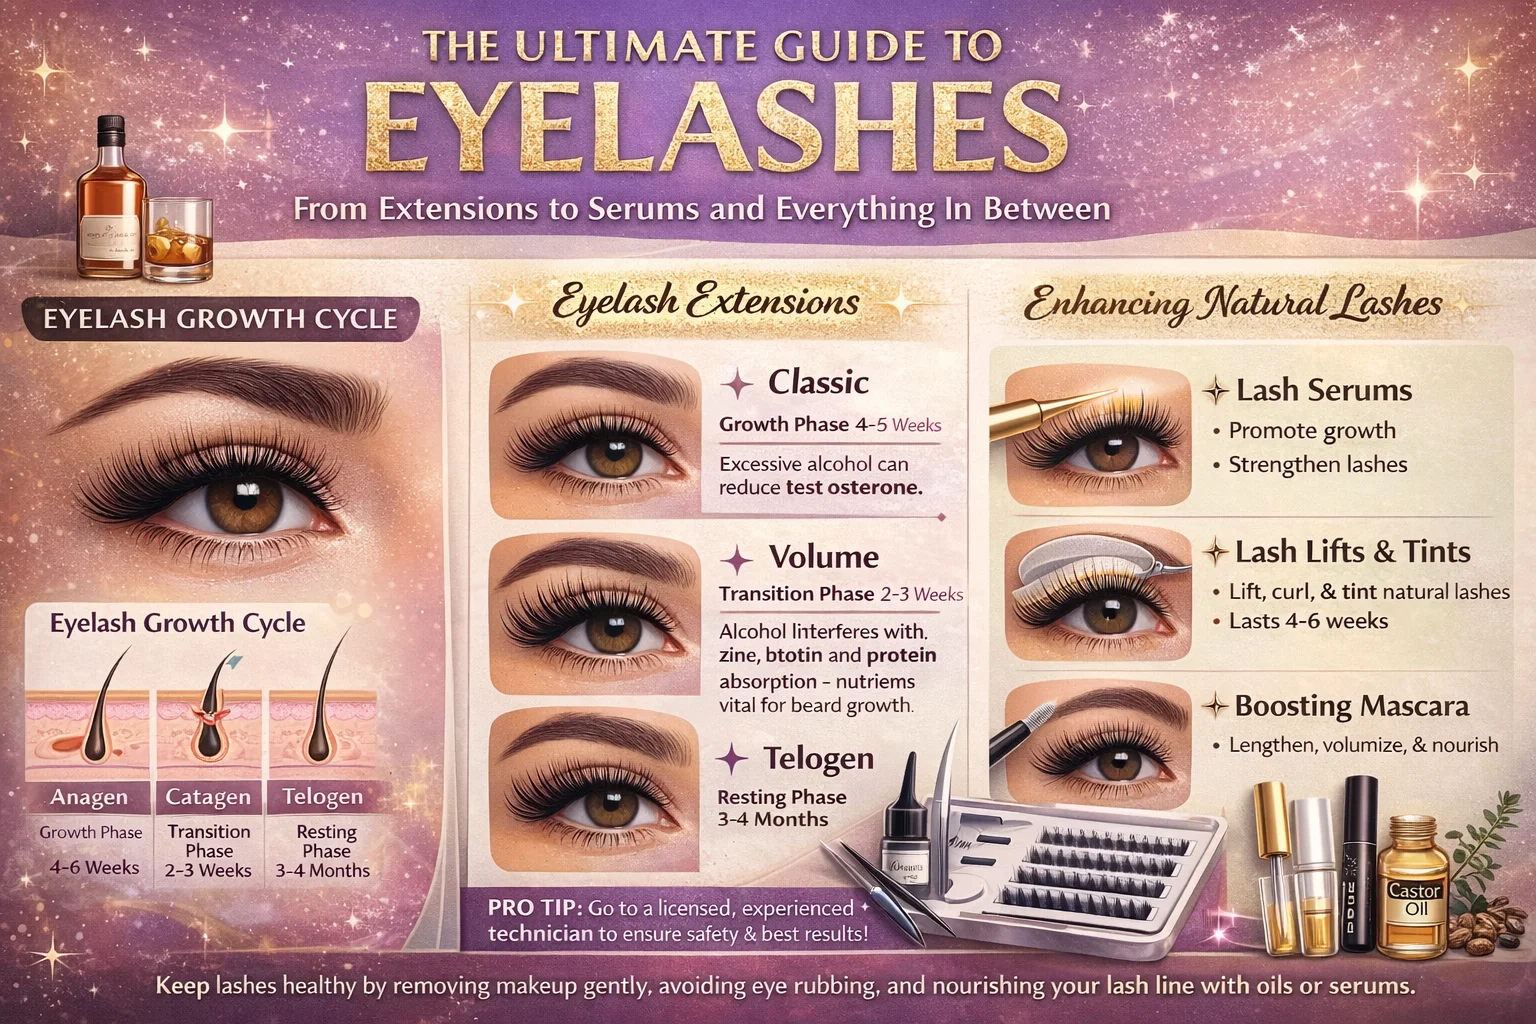
Your eyelashes naturally go through a growth cycle:
- Anagen (Growing Phase): 30–45 days.
- Catagen (Transition Phase): 2–3 weeks.
- Telogen (Resting Phase): 100+ days before shedding.
If you lose a lash due to rubbing, poor eyelash extensions removal, or an overzealous eyelash curler, a new one will typically grow back within 6 to 8 weeks. However, repeated trauma (like chronic pulling or poor-quality extensions) can damage the follicle permanently. So treat your eyelashes gently—they are fragile.
👉 Shop Eyelash Growth Serums on Amazon
(Click to find top-rated serums for faster regrowth.)
2. Eyelash Extensions vs. Magnetic Eyelashes: Which Is Right for You?
The biggest debate in beauty right now: eyelash extensions eyelashes (semi-permanent) versus magnetic eyelashes (reusable). Each has pros and cons.
Eyelash Extensions (Classic & Volume)
- How they work: A technician glues individual synthetic lashes to your natural eyelashes.
- Duration: 2–4 weeks with fills every 2–3 weeks.
- Pros: Natural look, no daily application, waterproof.
- Cons: Expensive ($150–$300 initial), time-consuming fills, potential for natural lash damage if the technician is inexperienced.
Magnetic Eyelashes
- How they work: Two strips with tiny magnets sandwich your natural lashes.
- Duration: Reusable for months.
- Pros: Affordable ($20–$50), no glue, reusable, instant application.
- Cons: Can feel heavy, magnets may show, not as natural-looking as high-end extensions.
Verdict: If you have the budget and want a “wake up looking perfect” solution, eyelash extensions win. If you prefer DIY and versatility, magnetic eyelashes are a fantastic alternative.
👉 Shop Magnetic Eyelashes on Amazon
3. Eyelash and Hair Extensions: Understanding the Difference
Many people search for eyelash and hair extensions together, but they are very different services.
| Feature | Eyelash Extensions | Hair Extensions |
|---|---|---|
| Material | Synthetic mink, silk, or PBT | Human hair or synthetic fibers |
| Attachment | Glued to individual lashes | Clipped, taped, or sewn to natural hair |
| Lifespan | 2–4 weeks | 6–12 weeks |
| Maintenance | No washing/rubbing | Requires special shampoo/brushing |
| Cost | $150–$300+ | $200–$1,000+ |
If you are looking for a full glam transformation, combining eyelash and hair extensions can give you a red-carpet look. However, always choose a licensed professional for both services to avoid damage.
👉 Find Eyelash Extension Supplies on Amazon
4. Finding “Eyelash Extensions Near Me”
Searching for eyelash extensions near me? Here is how to choose a quality technician:
Red Flags to Avoid:
- Prices under $100 for a full set (often poor quality glue or unsafe practices).
- No before/after photos.
- Using “permanent” glue near your waterline.
- No consultation about your natural lash health.
Green Flags to Look For:
- Certified by a recognized body (like Belle Beauty or Amazing Lash Studio).
- Uses weight-appropriate extensions (no longer than 2mm past your natural lash).
- Asks about allergies and eye conditions.
- Provides aftercare instructions (no oil-based makeup, no rubbing).
Pro tip: Read Google Reviews for eyelash extensions near me and look for the words “did not damage my natural lashes.” That is the gold standard.
👉 Buy Eyelash Extension Aftercare Kits on Amazon
5. The Best Eyelash Curler: Why Shiseido Wins
You might think all eyelash curler tools are the same. They are not. The best eyelash curler for most eye shapes is unanimously the shiseido eyelash curler.
Why the Shiseido Eyelash Curler Stands Out:
- Curve design: Unlike Western curlers (which are too flat), the shiseido eyelash curler has a gentler, 39mm curve that fits Asian and almond-shaped eyes perfectly.
- Pad quality: The silicone pad is extra firm, creating a 90-degree angle without crimping.
- No pinching: Users report zero pinching of the inner or outer corner of the eye.
How to Use an Eyelash Curler Safely:
- Always curl before applying mascara (curling after can break lashes).
- Pump gently 3–4 times—do not clamp and hold.
- If you have eyelash extensions, do not use a curler at all. The metal will cut the synthetic fibers.
Verdict: If you have straight, stubborn eyelashes, the shiseido eyelash curler is worth every penny.
👉 Buy Shiseido Eyelash Curler on Amazon
6. Eyelash Growth Serum: Does It Work?
Enter eyelash growth serum and eyelash serum—the billion-dollar category promising Disney-princess lashes in 4–6 weeks. But do they work?
The Science:
Most effective eyelash growth serum products contain prostaglandin analogs (like bimatoprost, the active ingredient in Latisse). These compounds extend the anagen (growth) phase of your eyelashes, allowing them to grow longer and thicker than natural.
Side Effects to Know:
- Darkening of the eyelid skin (reversible).
- Possible iris darkening (permanent, rare).
- Eye irritation or redness.
Natural Alternatives:
If you want to avoid prostaglandins, look for serums with peptides, biotin, and hyaluronic acid. They work more slowly but have no risk of iris color change.
A Note on “Uklash Eyelash Growth Serum -“
You may have seen searches for uklash eyelash growth serum – (with a dash, often meaning “excluding” certain ingredients). Uklash is a popular prostaglandin-free serum that uses peptides and plant extracts. It is a solid choice for sensitive eyes.
👉 Shop Eyelash Growth Serums on Amazon
7. Caring for Eyelash Extensions Eyelashes
Once you invest in eyelash extensions eyelashes, maintenance is everything. Here is a quick care checklist:
Do:
- Clean daily with a lash extension-safe foam cleanser.
- Brush with a clean spoolie each morning.
- Sleep on your back to avoid crushing.
Do Not:
- Use oil-based makeup remover (it dissolves the glue).
- Rub your eyes.
- Use a mechanical eyelash curler (it will cut the extensions).
- Get them wet for the first 24 hours after application.
How Often to Get Fills:
Every 2 to 3 weeks. By week 3, you will have lost 40–50% of your extensions due to natural shedding of your eyelashes.
👉 Buy Eyelash Extension Cleanser on Amazon
Final Verdict: Your Perfect Lash Routine
Here is a sample routine based on your goals:
| If you want… | Do this… |
|---|---|
| Low maintenance + natural | Use eyelash serum nightly + shiseido eyelash curler + mascara. |
| High impact + no daily work | Get professional eyelash extensions and skip mascara entirely. |
| Reusable + affordable | Buy magnetic eyelashes for weekends and events. |
| To fix sparse lashes | Start an eyelash growth serum and wait 8 weeks. And remember—do eyelashes grow back? Yes, but be patient. |
Your eyelashes are tiny but mighty. Whether you choose eyelash and hair extensions, a drugstore eyelash curler, or a prescription-strength eyelash serum, treat them with care. And if you ever wonder do eyelashes grow back after a bad extension experience—give it two months. They usually do.he Bottom Line Up Front: DIY Lash Extensions Are Different from Salon Extensions
Before we dive in, let’s clear up a major point of confusion. When you search for how to do eyelash extensions professionally, you’ll find that professional lash artists undergo certification training that costs thousands of dollars and requires state licensing. Those professionals apply individual lashes one by one using semi-permanent adhesive, a process that takes 1-2 hours.
DIY lash kits use a different system entirely. They rely on lash clusters (small groups of 3-5 lashes) and a bond and seal system that is far more forgiving for beginners. You can complete a full set in 10-15 minutes, and they last 3-7 days with proper care.
Throughout this guide, we’ll focus on the DIY cluster method—the safest and most practical approach for how to apply eyelash extensions on yourself for beginners.
How to Apply Eyelash Extensions on Yourself: Step by Step
What You’ll Need (Your DIY Lash Kit)
A quality DIY eyelash extensions kit should include:
| Essential Tool | Purpose |
|---|---|
| Lash clusters | Pre-made fans of 3-5 lashes; lightweight and reusable |
| Bond (adhesive) | Creates the sticky base for lashes to adhere |
| Seal (topcoat) | Locks clusters in place; removes tackiness |
| Applicator tool | Precision tweezers or wand for placement |
| Micro-spoolie brush | Applies bond and seal evenly |
| Remover gel | Dissolves bond for safe removal |
Optional but helpful: a magnifying mirror, good lighting, and a small fan to speed drying time.
Step 1: Prep Your Natural Lashes (Crucial!)
Skipping prep is the #1 reason DIY lashes fall off within hours. Start with completely clean, makeup-free lashes. Use an oil-free cleanser or micellar water to remove any residue—even trace amounts of oil will prevent the bond from adhering properly.
Your lashes must be completely dry before you begin. Pat gently with a clean towel and wait a few minutes to ensure no moisture remains.
💡 Pro Tip: Avoid using moisturizer or facial oils on the day of application. Oil-based products are the enemy of lash adhesive.
Step 2: Apply Bond to Your Natural Lashes
Using the micro-spoolie brush from your kit, apply a thin, light coat of bond to the underside of your natural lashes, close to the root but not touching your waterline.
Remember: Less is more. Overloading your lashes with bond will create clumps, weigh down your natural lashes, and actually reduce wear time.
Step 3: How to Apply Lash Extensions with Bond and Seal
Now for the main event: how to apply lash extensions with bond and seal.
3a. Pick up a cluster. Using your applicator tool, gently grip a lash cluster from the tray. Pick it up from the middle-outer end for optimal control.
3b. Place the cluster. Working one eye at a time, gently place the cluster underneath your natural lashes, as close to the lash line as possible. Do not place clusters directly on your skin or waterline—they should sit on your natural lashes only.
3c. Work in order. Start from the outer corner of your lash line and work inward, or vice versa. Place clusters right next to each other, slightly overlapping for a seamless look.
3d. Press to secure. Once positioned, use your applicator tool (or clean fingers) to gently squeeze the cluster against your natural lashes for a few seconds. This helps the bond grip.
Step 4: Apply Seal to Lock Everything In
After all clusters are placed, it’s time for the seal. Apply a thin coat of seal directly over where you applied the bond. Use a dabbing motion rather than swiping to avoid disturbing the clusters.
The seal serves two purposes:
- Removes tackiness so your lashes feel natural, not sticky
- Acts as a waterproof topcoat to extend wear time through humidity, sweat, and tears
💡 Pro Tip: Lightly coat your applicator with seal before pressing clusters against your natural lashes. This prevents the tool from sticking to the adhesive.
Step 5: Let Them Dry (Be Patient!)
Avoid touching your lashes for at least 5-10 minutes while the bond and seal set. For best results, keep your lashes away from steam and water for 24 hours. This means:
- No hot showers
- No saunas or steam rooms
- No crying (try your best!)
- No oil-based skincare around the eyes
If your kit includes a mini fan, use it to speed drying time.
Can You Do Individual Eyelash Extensions on Yourself?
The short answer is yes, but with caveats.
Individual lashes (single synthetic lashes applied one by one) are what professional lash artists use. Doing these on yourself is extremely difficult because:
- You need to isolate a single natural lash
- You must keep the extension from touching neighboring lashes
- The adhesive is much stronger (and riskier near eyes)
Most DIYers who want the “individual lash” look use cluster lashes instead. Clusters create a similar full, wispy effect but are far easier to apply.
How to Do Eyelash Extensions Professionally (The Real Deal)
If you’re wondering how to do eyelash extensions professionally as a potential career, the path is much more involved:
- Certification required: Most states require you to be a licensed cosmetologist, esthetician, or makeup artist before taking lash certification courses.
- Training hours: Professional certification programs typically include 40+ hours of training covering lash anatomy, safety protocols, isolation techniques, and live model application.
- Cost: Professional certification can cost $5,000-$10,000+ depending on the program.
- Advanced techniques: Professionals learn classic, hybrid, and volume methods, plus lash mapping for different eye shapes.
For home use, stick to DIY cluster kits—they’re safe, effective, and a fraction of the cost.
How to Put Eyelash Extensions: Pro Tips for Beginners
Common Mistakes to Avoid
| Mistake | Why It’s a Problem | Fix |
|---|---|---|
| Using too much bond | Causes clumping and premature fallout | Apply a whisper-thin coat only |
| Placing clusters on skin | Can irritate waterline; won’t last | Place on natural lashes only |
| Skipping the seal | Lashes feel sticky; won’t last as long | Always finish with seal |
| Wetting lashes too soon | Bond needs 24 hours to fully cure | Avoid water/steam for a full day |
How Long Do DIY Lash Extensions Last?
With proper application and care, DIY cluster lashes typically last 3 to 7 days. To extend wear:
- Avoid oil-based cleansers and makeup removers
- Sleep on your back (not your stomach/face)
- Brush lashes gently with a clean spoolie each morning
- Fill gaps with new clusters instead of replacing the whole set
How to Remove Lash Extensions Safely
Never, ever pull or tug on your lashes. This will damage your natural lashes and potentially cause bald spots.
Proper removal method:
- Apply remover gel to your lash line, coating both top and bottom of the clusters
- Let it sit for 10-20 seconds to dissolve the bond
- Gently slide or wipe off the clusters
- Clean your eye area with your regular cleanser to remove any residue
Recommended DIY Lash Kits for Beginners
Best Overall: MODELROCK LASH PLAY DIY Starter Kit
- Includes: Clusters, bond, seal, remover gel, applicator, spoolie
- Wear time: Up to 7 days
- Best for: First-timers who want everything in one box
Best Budget: KISS Falscara Starter Kit
- Includes: Wisps, bond, seal, applicator
- Wear time: 3-5 days
- Best for: Trying DIY lashes without a big investment
Best for Natural Look: Ardell Naked Extensions
- Includes: 56 individual-style clusters, adhesive, remover, tweezers
- Wear time: Up to 2 weeks
- Best for: Experienced users wanting salon-like results
Final Thoughts: You Can Do This
Learning how to apply eyelash extensions for beginners takes practice. Your first attempt might not be perfect—and that’s okay. Start with a budget-friendly kit, watch a few tutorial videos, and give yourself time to get comfortable with the process.
The beauty of DIY lash clusters is that they’re forgiving. Made a mistake? Remove and retry. Don’t like the placement? Adjust it. With the bond and seal system, you have flexibility that salon extensions simply don’t offer.
To recap:
- How to apply eyelash extensions on yourself step by step: Prep → Bond → Place clusters → Seal → Dry
- Can you do individual eyelash extensions on yourself? Yes, using cluster lashes (not single lashes)
- How to put eyelash extensions properly: Work from outer to inner corner, overlap slightly, press to secure
- What’s in a DIY eyelash extensions kit: Clusters, bond, seal, applicator, remover, spoolie
- How to apply lash extensions with bond and seal: Bond first (thin coat), place clusters, seal on top (dab, don’t swipe)
Now go forth and lash, confidently.he Bottom Line Up Front: DIY Lash Extensions Are Different from Salon Extensions
Before we dive in, let’s clear up a major point of confusion. When you search for how to do eyelash extensions professionally, you’ll find that professional lash artists undergo certification training that costs thousands of dollars and requires state licensing. Those professionals apply individual lashes one by one using semi-permanent adhesive, a process that takes 1-2 hours.
DIY lash kits use a different system entirely. They rely on lash clusters (small groups of 3-5 lashes) and a bond and seal system that is far more forgiving for beginners. You can complete a full set in 10-15 minutes, and they last 3-7 days with proper care.
Throughout this guide, we’ll focus on the DIY cluster method—the safest and most practical approach for how to apply eyelash extensions on yourself for beginners.
How to Apply Eyelash Extensions on Yourself: Step by Step
What You’ll Need (Your DIY Lash Kit)
A quality DIY eyelash extensions kit should include:
| Essential Tool | Purpose |
|---|---|
| Lash clusters | Pre-made fans of 3-5 lashes; lightweight and reusable |
| Bond (adhesive) | Creates the sticky base for lashes to adhere |
| Seal (topcoat) | Locks clusters in place; removes tackiness |
| Applicator tool | Precision tweezers or wand for placement |
| Micro-spoolie brush | Applies bond and seal evenly |
| Remover gel | Dissolves bond for safe removal |
Optional but helpful: a magnifying mirror, good lighting, and a small fan to speed drying time.
Step 1: Prep Your Natural Lashes (Crucial!)
Skipping prep is the #1 reason DIY lashes fall off within hours. Start with completely clean, makeup-free lashes. Use an oil-free cleanser or micellar water to remove any residue—even trace amounts of oil will prevent the bond from adhering properly.
Your lashes must be completely dry before you begin. Pat gently with a clean towel and wait a few minutes to ensure no moisture remains.
💡 Pro Tip: Avoid using moisturizer or facial oils on the day of application. Oil-based products are the enemy of lash adhesive.
Step 2: Apply Bond to Your Natural Lashes
Using the micro-spoolie brush from your kit, apply a thin, light coat of bond to the underside of your natural lashes, close to the root but not touching your waterline.
Remember: Less is more. Overloading your lashes with bond will create clumps, weigh down your natural lashes, and actually reduce wear time.
Step 3: How to Apply Lash Extensions with Bond and Seal
Now for the main event: how to apply lash extensions with bond and seal.
3a. Pick up a cluster. Using your applicator tool, gently grip a lash cluster from the tray. Pick it up from the middle-outer end for optimal control.
3b. Place the cluster. Working one eye at a time, gently place the cluster underneath your natural lashes, as close to the lash line as possible. Do not place clusters directly on your skin or waterline—they should sit on your natural lashes only.
3c. Work in order. Start from the outer corner of your lash line and work inward, or vice versa. Place clusters right next to each other, slightly overlapping for a seamless look.
3d. Press to secure. Once positioned, use your applicator tool (or clean fingers) to gently squeeze the cluster against your natural lashes for a few seconds. This helps the bond grip.
Step 4: Apply Seal to Lock Everything In
After all clusters are placed, it’s time for the seal. Apply a thin coat of seal directly over where you applied the bond. Use a dabbing motion rather than swiping to avoid disturbing the clusters.
The seal serves two purposes:
- Removes tackiness so your lashes feel natural, not sticky
- Acts as a waterproof topcoat to extend wear time through humidity, sweat, and tears
💡 Pro Tip: Lightly coat your applicator with seal before pressing clusters against your natural lashes. This prevents the tool from sticking to the adhesive.
Step 5: Let Them Dry (Be Patient!)
Avoid touching your lashes for at least 5-10 minutes while the bond and seal set. For best results, keep your lashes away from steam and water for 24 hours. This means:
- No hot showers
- No saunas or steam rooms
- No crying (try your best!)
- No oil-based skincare around the eyes
If your kit includes a mini fan, use it to speed drying time.
Can You Do Individual Eyelash Extensions on Yourself?
The short answer is yes, but with caveats.
Individual lashes (single synthetic lashes applied one by one) are what professional lash artists use. Doing these on yourself is extremely difficult because:
- You need to isolate a single natural lash
- You must keep the extension from touching neighboring lashes
- The adhesive is much stronger (and riskier near eyes)
Most DIYers who want the “individual lash” look use cluster lashes instead. Clusters create a similar full, wispy effect but are far easier to apply.
How to Do Eyelash Extensions Professionally (The Real Deal)
If you’re wondering how to do eyelash extensions professionally as a potential career, the path is much more involved:
- Certification required: Most states require you to be a licensed cosmetologist, esthetician, or makeup artist before taking lash certification courses.
- Training hours: Professional certification programs typically include 40+ hours of training covering lash anatomy, safety protocols, isolation techniques, and live model application.
- Cost: Professional certification can cost $5,000-$10,000+ depending on the program.
- Advanced techniques: Professionals learn classic, hybrid, and volume methods, plus lash mapping for different eye shapes.
For home use, stick to DIY cluster kits—they’re safe, effective, and a fraction of the cost.
How to Put Eyelash Extensions: Pro Tips for Beginners
Common Mistakes to Avoid
| Mistake | Why It’s a Problem | Fix |
|---|---|---|
| Using too much bond | Causes clumping and premature fallout | Apply a whisper-thin coat only |
| Placing clusters on skin | Can irritate waterline; won’t last | Place on natural lashes only |
| Skipping the seal | Lashes feel sticky; won’t last as long | Always finish with seal |
| Wetting lashes too soon | Bond needs 24 hours to fully cure | Avoid water/steam for a full day |
How Long Do DIY Lash Extensions Last?
With proper application and care, DIY cluster lashes typically last 3 to 7 days. To extend wear:
- Avoid oil-based cleansers and makeup removers
- Sleep on your back (not your stomach/face)
- Brush lashes gently with a clean spoolie each morning
- Fill gaps with new clusters instead of replacing the whole set
How to Remove Lash Extensions Safely
Never, ever pull or tug on your lashes. This will damage your natural lashes and potentially cause bald spots.
Proper removal method:
- Apply remover gel to your lash line, coating both top and bottom of the clusters
- Let it sit for 10-20 seconds to dissolve the bond
- Gently slide or wipe off the clusters
- Clean your eye area with your regular cleanser to remove any residue
Recommended DIY Lash Kits for Beginners
Best Overall: MODELROCK LASH PLAY DIY Starter Kit
- Includes: Clusters, bond, seal, remover gel, applicator, spoolie
- Wear time: Up to 7 days
- Best for: First-timers who want everything in one box
Best Budget: KISS Falscara Starter Kit
- Includes: Wisps, bond, seal, applicator
- Wear time: 3-5 days
- Best for: Trying DIY lashes without a big investment
Best for Natural Look: Ardell Naked Extensions
- Includes: 56 individual-style clusters, adhesive, remover, tweezers
- Wear time: Up to 2 weeks
- Best for: Experienced users wanting salon-like results
Final Thoughts: You Can Do This
Learning how to apply eyelash extensions for beginners takes practice. Your first attempt might not be perfect—and that’s okay. Start with a budget-friendly kit, watch a few tutorial videos, and give yourself time to get comfortable with the process.
The beauty of DIY lash clusters is that they’re forgiving. Made a mistake? Remove and retry. Don’t like the placement? Adjust it. With the bond and seal system, you have flexibility that salon extensions simply don’t offer.
To recap:
- How to apply eyelash extensions on yourself step by step: Prep → Bond → Place clusters → Seal → Dry
- Can you do individual eyelash extensions on yourself? Yes, using cluster lashes (not single lashes)
- How to put eyelash extensions properly: Work from outer to inner corner, overlap slightly, press to secure
- What’s in a DIY eyelash extensions kit: Clusters, bond, seal, applicator, remover, spoolie
- How to apply lash extensions with bond and seal: Bond first (thin coat), place clusters, seal on top (dab, don’t swipe)
Now go forth and lash, confidently.
👉 Browse All Eyelash Products on Amazon
Disclosure: As an Amazon Associate, I earn from qualifying purchases. This helps support our content at no extra cost to you. All links are universal search links for USA customers using store ID cosmoclinic-20.